Tag Archives: paper

A Potpourri of Precarious Props: Paper Mario TTYD’s Stage Hazards

One of the most maligned, yet uniquely flavorful additions to Paper Mario: The Thousand-Year Door is the added presence of the battle arena. The occasional dropped props and stray sprays add that little bit of character to the stage, as well as a sometimes unwelcome extra element of unpredictability to the outcome of a fight. Unlike the audience, a surprising amount of whose mechanics can be calculated and planned for with a lot of game knowledge, any attacks with a chance of causing stage hazards can never have their effects predicted completely. That said, it’s always worth knowing exactly what you could be up against, so let’s do a deep dive on all the different types of stage hazards and their individual quirks!

Overview

Pretty much every attack performed in the battle (including using items) does a check to see whether any stage hazards should occur once it’s ended. The attack’s weapon parameters specify chances of each of the different types of hazards occurring; these vary between attacks, typically not exceeding 10% except for particularly destructive attacks such as Power Jump, Quake Hammer or Bob-ombast. Of note, nearly all enemy attacks don’t have any chance of causing stage hazards to occur.

The possible effects are as follows, and occur in this order:

  • Background props falling
  • Stage jets turning
  • Stage jets firing
  • Ceiling beam falling
  • Offscreen props (“objects”) falling

Let’s dive into each of them individually…

Background Props

Every battle scene is outfitted with a varying number of stage props, meant to invoke the look of the area it takes place in. These backgrounds broadly form a few layers, named (from foreground to background) “A1”, “A2”, and “B”. The amount of props fitting each of these layers varies from scene to scene; relatively few actually have all three.

A sample battle scene from the Petal Meadows region, showing which props belong to which layers.

To determine which of these background props fall after an attack, there are two different random checks performed. First, a weighted random roll is performed to determine which of the A layers to destroy, if either. In practice, all attacks have a 100 weight for nothing to be destroyed, some weight < 100 that is used for each of A1 and A2 individually, and a weight of 0 for both to be destroyed at once.

For example, Power Jump has a 25 weight for A1 and A2 individually, and 100 weight for nothing to fall, meaning that 25/150 = 1/6 of the time, A1 is destroyed, and another 1/6 of the time A2 is destroyed. If the background layer this random roll determined should be destroyed doesn’t exist or already fell as the result of a previous attack, nothing happens instead (and the weights aren’t changed).

If the A1 layer doesn’t exist for a given scene or has already fallen down, a second random check is done to see if the B layer should be destroyed, this time just checking if a single random value from 0-99 is less than a given threshold. (Again, Power Jump has a value of 25 for the B layer, leading to a 25% chance of this occurring). If the A2 layer still exists at this point, it falls down with the B layer.

As for how this affects combat, background props are fairly tame, with the A1 and B layers of props both causing a single point of damage upon falling (which can be negated by guarding or Superguarding). This damage may only affect either the player or enemy side of the field, depending on the layout of the props (for the scene above, A1 will only damage enemies, but B will damage everyone). The A2 layer is purely cosmetic, in any case, and usually consists of props that are short and low to the ground.

Ceiling Beam

Similarly to the background falling, the falling ceiling beam causes 1 damage to all actors, as well as grounding anything currently attached to the ceiling. This can be used to end Rawk Hawk’s ceiling phase prematurely (though all attacks available at that time have a very small chance of causing the ceiling to drop).

Notably, Spring Jump cannot be used successfully when the ceiling beam is present; Mario will slam into the ceiling before having a chance to reach his target. This has a whopping 50% chance of making the ceiling fall, though!

Stage Jets

The stage jets (“nozzles” internally) are added to the decor when Mario reaches B-List Star status (level 10), and are probably the most infamous stage hazard. Meant to evoke fog machines and flashy pyrotechnics on real-life concert stages, these function quite similarly, resulting in a fog that covers the stage, or if the jets are pointed towards the stage, a variety of damaging and/or status-inducing effects.

There are four types of stage jets: fog, ice, explosions and fire. These appear in varying proportion based on Mario’s current rank:

RankFogIceExplosionFire
B-List Star (Lv. 10-19)65%35%
A-List Star (Lv. 20-29)35%25%40%
Superstar (Lv. 30+)20%20%25%35%

The type of jet never changes within a single battle, and is determined either at the start of the battle (firing off before combat starts) in fights without a First Strike, or on the first attack in which they are randomly determined to fire otherwise.

After every attack, the jets do two independent random checks: one to toggle between all facing upward, and each facing the left or right side of the stage, and one to determine whether or not they should fire. For instance, performing a normal Hammer attack has a 6% to make the jets turn, and a 2% chance to make them fire.

If the jets are facing the stage when they fire, then attack parameters are constructed dynamically to determine who should be targeted and how strong the effects should be. This is done by taking a base set of parameters for each side with at least one jet facing it (which basically specifies nothing except for which targets to filter out; one for the player’s side that disallows enemies and system actors, and one for the enemies’ that disallows system actors, Mario / Shell Shield, and his partner), and mixing it with parameters for the individual jet types that determine the attack’s damage and damage function, its elemental type, and what statuses should be applied (with the damage and status turn count being multiplied by 1, 2, or 3 based on how many jets are facing that side) as follows:

Jet TypeDamage FunctionBase DamageElementStatus
FogFixed0NormalNone
IceNon-damagingIceFreeze, 1 turn
ExplosionFixed2ExplosionNone
FireFixed1FireBurn, 3 turns

Interestingly, the ice jets are completely non-damaging, meaning that they are incapable of dealing damage, even to enemies weak to the Ice element. By contrast, the fog jets’ attack, which normally does nothing, can cause damage due to P-Up, D-Down.

An especially odd quirk of stage jet attacks is that because of the way they are dynamically constructed and how barebones the base “player side” and “enemy side” attack parameters are, they do not include the “force target only high-priority parts” flag normally included on multi-target attacks. This means that any enemy that has multiple targetable parts tied to the same actor has all of them targeted simultaneously, usually resulting in multiple times the intended damage.

The affected parties include the dragons (head and foot), Grodus (both him and his staff; even though the staff doesn’t make Grodus take damage, both hits count towards the chance of his next attack failing), and both Magnus von Grapple bosses, who as mentioned in the previous article have separate hitboxes for their body and foot to make attacks land more naturally:

Worst of all, Cortez’s first two forms cause his head and and bone pile to both be hit at once, and after attacking his bone pile twice in the second phase, his head, bone pile, and the exposed gem in his chest (which takes an extra point of damage due to elemental weakness) can all take damage simultaneously for up to a whopping 17 damage at once!

Fog Jets

As their name suggests, fog jets’ main effect doesn’t come from their damage (or lack thereof, as the case usually is); their more notable effect is that when they fire, the stage becomes shrouded in fog for 2 turns, which causes most attacks to miss 50% of the time. Unlike the other types, this occurs regardless of whether they are facing the stage. (However, the “attack” part will only occur if they’re facing a side, unless that attack itself misses due to the fog!)

A few attacks, mostly the Special Moves, are able to skip the fog’s miss check, but generally you’re forced to wait the 2 turns out; however, there are a handful of actions that can dispel the fog prematurely:

  • Bobbery Appealing
  • Bobbery using Bomb (happens after the attack, so it can still miss)
  • Bobbery’s Bomb Squad bombs exploding (happens before the attack)
  • Bobbery’s Bob-ombast (happens before the attack)
  • Bobbery’s Hold Fast being triggered
  • Bob-ombs exploding (if attacking, the miss check happens before it hits)
  • Bulky Bob-ombs or Bob-ulks exploding (happens before the attack)
  • Flurrie’s Gale Force
  • Using an Ice Storm item

Of these, Bomb, Bob-ombast and Gale Force all have a chance of bringing the fog back immediately afterward, but if your aim is to clear the fog without that chance, appealing with Bobbery and using Ice Storm can’t cause any stage effects, so go wild!

Falling Objects

The final and most varied group of hazards. Each attack does a single random roll to see if an offscreen prop should fall, and if that chance succeeds, picks one of the eligible prop types for Mario’s current rank with equal probability. Here are the nine types of falling objects in action:

A deluge of decor and debris!

And here are their effects:

Prop TypeMinimum rankDamageStatus
BucketRising Star1Dizzy (3 turns, 50%)
Stage lightRising Star1Electric (3 turns, 25%)
BasinB-List Star1Dizzy (3 turns, 50%)
WaterB-List StarMultiple (clear, 100%)*
Small bug(s)**A-List StarConfuse (3 turns, 50%)
Large bugA-List Star1Confuse (3 turns, 50%)
ForkA-List Star2Sleep (0 turns, 100%)***
MeteorSuperstar3Dizzy (3 turns, 50%)
Bowser statueSuperstar5Confuse (3 turns, 100%)

* The water stage effect clears the following statuses: Sleep, Stop, Dizzy, Poison, Confuse, Electric, Burn, Freeze, Charge, and Payback. (Guarding it will stop all statuses from being cleared.)
** The small bugs come in two sub-varieties, either a single small bug or a swarm of them; they still only count as one type of object.
*** This effectively clears the Sleep status. Note that this does not guarantee it’s cleared if the target has < 100% Sleep vulnerability; if the vulnerability roll fails and the 50% chance of the target waking up from attack fails, the target might remain asleep.

The target of the falling objects is chosen like randomly targeted enemy attacks, choosing randomly from all non-system actors with a 10% bias to the leftmost character (i.e. whoever the player has in the back), except the meteor and Bowser statue, which always hit all characters, or all characters on a randomly chosen side, respectively. There is also a 10% chance of any of the single-target hazards to hit the audience instead, causing all the audience members in a small range around the impact point to leave.

Closing notes / miscellanea

This covers most of the important info on stage hazards, but a couple more notes:

  • Mischief-causing Shy Guy audience members will trigger either a falling object or the stage jets to fire with equal probability (assuming Mario is B-List or higher; otherwise it will always be a falling object). The side of the screen the Shy Guy runs off to has no impact on who the falling objects target.
  • Some types of stage hazards might be disabled during special occasions. Notably, falling objects are disallowed during the Crump prologue fight and all tutorial fights, and the ceiling from the Chapter 5 Crump fight is impossible to destroy (unlike the Rawk Hawk fight).
  • There’s an unused byte after the usual stage hazard rate parameters that takes on similar values to the others, which suggests there might have been another type of stage hazard that was cut from the game earlier in development. Even as early as the July 2004 demo, there isn’t any code that seems to reference the parameter directly, so it’s only speculative what it could have done.
  • The only enemy attacks that are able to cause stage hazards are the dragons’ stomp, which have a 10% chance of causing a falling object. If you feel like winning the lottery, try getting Hooktail’s stomp to self-inflict Electric status (which she has only a 10% susceptibility to)!

If you’re interested in looking at the rates for specific player attacks, you can find a spreadsheet of the hazard chances caused by player attacks in my stats Drive folder, or you can dump the attack parameters and event scripts for all attacks in the game using my ttyd-utils suite of scripts (look for calls to “btlevtcmd_WeaponAftereffect” in the event scripts to see which attacks actually use their parameters!)

Until next time, where I’ll cover the basics of enemy attack AI!

TTYD’s Attack Parameters: Becoming a Wizard of Weaponry

Paper Mario: The Thousand-Year Door pits Mario and his companions against a wealth of different enemies. In combat, both sides have access to a wide variety of different moves, with different attack patterns (single-target, multi-hit, spread…) and performing different functions, from direct damage to buffing allies with status effects. On the face of it, these moves have several pretty easily distinguishable features, such as their FP or SP cost, which status they inflict, or whether they pierce defense. However, there’s a lot of subtlety hidden past these surface-level attributes — What exact targets can the move reach? Does it make direct contact (i.e., can it be stopped by spikes or elemental hazards)? Do enemies prefer to use an attack on some targets more than others?

This article will be an overview of what parameters the game uses to define these properties of attacks, and more.

What is an “attack”, exactly?

There’s a lot of different ways any given action taken by a player or enemy can be classified and subdivided; here’s my attempt to briefly clarify my terminology for the components of these actions, and what the game internally refers to things as for context.

As described in the article on turn structure I wrote last year, both player characters and enemy characters generally perform their primary combat actions in their respective “active phase”. In the case of player, they choose their commands from a menu, whereas an enemy will perform an action based their AI (specifically, their “attack script”). Both the player and enemies (collectively, “actors”) may choose to do several sorts of actions that don’t really classify as “attacks”, for instance:

  • Restoring HP, FP, or SP (via items, or special enemy abilities like Magikoopas’ healing magic or Bonetail’s heals).
  • Changing between states or forms (e.g. the player Defending, a Koopa Troopa un-flipping itself, a Dark Boo rising into an aerial state).
  • Other specialized actions, such as fleeing from battle, spawning extra allies, etc.

These sorts of actions, and how enemies choose what actions to perform are largely out of the scope of this article (and the latter will definitely be covered at a later date).

We can consider any action where an actor targets one or more actors in the battle (including itself) with the intent to deal damage or apply status effects an “attack”. Generally, the execution of an attack proceeds as follows:

  • Find all the possible targets of an attack (this is done before the player is able to select a command; if there are no possible targets, that option will be greyed out).
  • Determine which targets will be affected (possibly by the player / enemy’s choice).
  • Start executing the event script associated with the specific attack (to handle movement, Action Commands, etc.)
  • Before hitting each affected target:
    • Check to see if the hit succeeds (Did the attacker miss due to invis / evasion / accuracy, etc.? Were they countered by a hazard or Superguard?)
    • If the attack did successfully connect, apply the appropriate damage and/or status.

The main data structure specific to each attack that determines its properties is called a “weapon” internally. To some degree this sort of terminology makes sense (one could imagine an actor holding a physical ‘weapon’ that has an inherent range, damage, and status…), but generally players will attribute those properties to the attack itself, so I might use the term “attack” to interchangeably mean the entire attacking action, as well the “weapon” (or weapons, e.g. the different hits of a Spin Jump or Tornado Jump) used as a part of it from now on. Notably, weapons can also be used for some non-attacking moves for determining targets, even though the rest of the parameters won’t apply.

Incidentally, the concept of “attacks” can be extended to non-combatant-initiated moves as well; e.g. Bomb Squad bombs’ explosion, falling stage objects (or jets, walls, ceilings…), and audience Boos’ invisibility-granting swoop.

Attack parameters

Now that we have a baseline for what counts as an attack, let’s take a look at the data that makes up a “weapon”. If you want to look at the raw definition of the weapon structure, as well as many other structures used in TTYD’s battle system, I suggest reading through this resource on my “ttyd-utils” GitHub repository (look for the “BattleWeapon” struct).

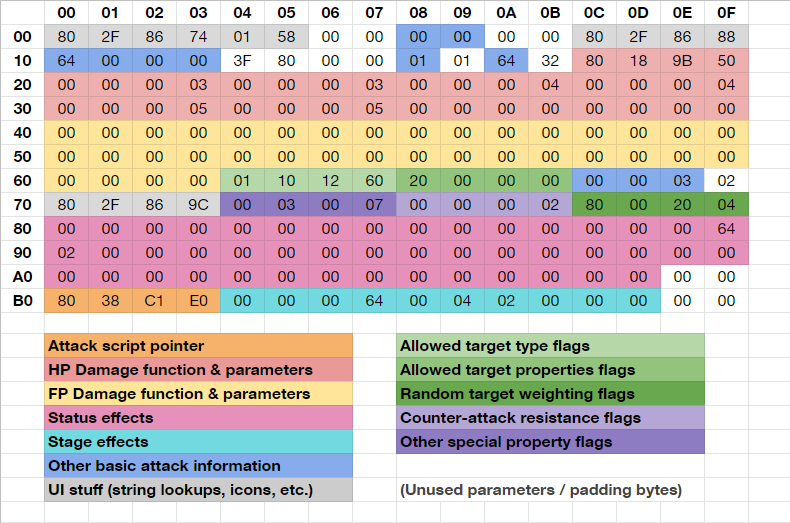
Here’s what the raw weapon data looks like for Vivian’s Shade Fist; I’ve broken it up into bytes and color-coded which bytes pertain to various types of information:

The raw bytes making up the WeaponData struct used by Vivian's Shade Fist attack.

Let’s do a deep dive through each of these categories, and describe all the possible values they can take on.

Attack Script Pointer

A pointer to the event script that is used to execute the attack from beginning to end. This is only generally used by player attacks and items, since enemies’ behavior and attacks are all baked into a single “attack script”.

Damage functions & parameters

All weapons that deal damage have to specify a function that determines their base damage, which can take up to eight parameters. (Similarly, attacks that deal FP damage have a separate function & set of parameters for that). The following is a list of all the functions used:

  • Fixed damage – Deals the damage specified by the first parameter. This is used by pretty much all enemy and item attacks.
  • Attack level + AC success-based – Deals a different amount of damage based on the rank of the jump/hammer/partner, and whether or not the Action Command was performed successfully.
  • Jump/Hammer + Badge Stacking – Same as the above, but adds an additional N damage per copy of the move’s associated badge equipped.
  • Action Command-based – Deals base damage + additional damage based on the output value from an Action Command (that value’s usage varies based on the type of AC).
  • Partner rank level – Deals damage based on the partner’s rank only (used for Doopliss’s partners).
  • HP / FP halved – Deals 1/2 the target’s HP or FP (there are variants to round up or down for HP).
  • Tornado Jump tornadoes – Deals fixed base damage, plus an additional N per copy of Tornado Jump equipped.
  • Hooktail FX R scaling – Deals base damage, minus the number of hits taken where Attack FX R activated.
  • Special functions based on the internals of Earth Tremor, Art Attack and Supernova.
  • Null, i.e. no damage is dealt by this move.

Notably, attacks can have a non-null damage function but still deal 0 base damage; such attacks can deal damage if the weapon can be affected by badges or statuses (e.g. Flower Fuzzies’ FP draining attack with a Power Punch), and/or if the target has P-Up, D-Down badges equipped (e.g. the fog stage effect).

Status Effects

Determines which status effects the attack causes, and their success rate, strength and turn count when applicable. Shade Fist, for example, causes Burn with a 100% base rate for 2 turns. The base success rate is multiplied by the enemy’s vulnerability to the status to determine how often it works, in most cases.

Stage Effects

Determines the chances of the move causing stage hazards: background falling, stage jets turning and/or firing, the ceiling falling, and props falling. There’s an extra parameter that seems to have been intended for use with another type of stage hazard in the past, but no code seems to remain that references it.

Other basic attack info

Miscellaneous parameters that aren’t part of the specialized ‘flags’ sections:

  • Item type (for attack items)
  • Base accuracy (always 100%, but theoretically a move could be given a natural miss rate, lol)
  • Base FP / SP (in full 1.00 units) cost
  • Superguard-ability (can the attack be Superguarded, and does it cause the enemy to recoil?)
  • Stylish command SP strength (always 1 in the US version, but some attacks in the Japanese release have 2x or 3x Stylish SP; see this video for more info!)
  • BINGO card chance on success
  • Element (normal, fire, ice, explosion, or electric)
  • On-hit effects (Mostly visual effects like Love Slap spinning the enemy around, but also includes the knockback effects from Gulp and the Hammer spin moves).
  • Action Command difficulty (always 3 by default; can range from 0 to 6, which would normally be the equivalent of 3 Simplifiers or 3 Unsimplifiers)

Allowed Target types

A set of flags that if set, can enable / disable certain types of actors from being targeted:

  • Cannot target Mario (or Shell Shield, if he’s currently shielded)
  • Cannot target partners
  • Cannot target enemies
  • Cannot target “system” units (the “system” actor itself, or Bomb-Squad bombs; pretty much all attacks disallow this)
  • Cannot target opposite alliance
  • Cannot target own alliance (Most attacks use alliance-based restrictions rather than Mario/party/enemy ones; these restrictions are flipped if the attack is used when Confused).
  • Cannot target self
  • Cannot target same species of actor
  • Only target self
  • Only target Mario
  • Single-target / Multi-target
  • Cannot target anything (probably only set dynamically)

There are also two flags that narrow down which parts of enemies with multiple targets can be targeted. In some cases, the difference between targetable parts can be mechanically interesting (Grodus vs. his staff, Cortez’s bone pile / rib cage) or a matter of timing preference (the dragons’ nose vs. their foot), but some enemies, like the Magnus von Grapple bosses, have two functionally identical but different target points for aerial and grounded attacks, just so the point of impact looks more natural.

  • “Force target highest-priority part” – Will force the attack to target the main part of an enemy if within range, and a secondary one if not. This is generally used for picking the more natural hitbox for a certain range of move to target if there are multiple equivalent options, but this does also mean some attacks with otherwise unrestricted range, such as Shade Fist, don’t have the choice to target Grodus’ staff or Cortez’s ribcage. Of note, Fire Drive is the only multitarget move besides Bomb Squad to not have this option set, meaning that all reachable parts are hit at once (making it hit Grodus and his staff).
  • “Only target certain high-priority parts” – Used only by Bomb Squad bomb explosions; the details are kind of fiddly but in practice this is generally used to make sure only one target can be hit at once on the same enemy (though Cortez notably can be hit on his open ribcage and bone pile at the same time).

If neither of those flags is set, the attack can freely target anything that is allowed by the enemy’s class / part properties, and the “archetype” of attack being used, as described in the next section:

Allowed Target properties / Attack Archetypes

Flags that control the range of an attack, as well as what “archetype” an attack belongs to.

  • Archetypes:
    • “Jump-like” – Generally doesn’t restrict anything, aside from a couple of cases where you’re forced to target a higher hitbox rather than a functionally identical lower one (e.g. Magnus and Magnus 2.0), and the special case in Cortez phase 2 where his head is too high to reach.
    • “Hammer-like” – Generally, disallows hitting aerial targets. Used by Gulp, Bomb, Love Slap, most grounded enemy attacks, etc.
    • “Shell Toss-like” – Functionally identical to Hammer-like, but used by Koops’ and enemies’ shell attacks.
    • “Tattle-like” – Generally forces you to target a specific part of each enemy for Tattles.
    • (Note that attacks can belong to none of the above archetypes, in which case they don’t have any of their specific target restrictions, e.g. Quake Hammer, all Special Moves, …)
  • Other properties:
    • Cannot target ceiling (used by jumps, Koops’ attacks, etc.)
    • Cannot target floating (used by Quake Hammer, Magnus’ earthquake, etc.)
    • Cannot target grounded (used by Tornado Jump’s tornadoes)
    • Recoil-type attack – prevents self-targeting if knocked back by Gulp or the spin Hammers, since those attacks are considered to be done by the actor being flung.
    • Target same / opposite alliance direction – Determines which direction should be considered the “front”; for the player, the “same” direction would mean treating the rightmost target on the stage as the front, where “opposite” would mean treating the leftmost as the front. Generally, attacks against the opposing team use the “opposite” direction, but buffs use the “same” direction.
    • Can only target front targets – Using the above definition of “front”, prevents the attack from being able to reach enemies behind the frontmost grounded target. This does still allow for targeting aerial enemies in front of it (provided the attack can normally hit them), though. There’s also a barely-used feature where enemies sufficiently far in the background (-30 or more units on the Z-axis) count as being on a different plane; this is what allows attacks like Shell Toss to be able to target the Shadow Queen or her right hand, but is basically only used in that fight (enemies in standard fights span from -20 to +20 units from the origin on the Z-axis).

Random target weighting schemes

After narrowing down the valid targets using the parameters above, if the attack being used doesn’t have the means of selecting a target manually (such as Mini-Egg’s eggs or the vast majority of enemy attacks), each valid target is assigned a weight, and those values are used to either select a target randomly, or based on the highest weight.

By default, these weights are 110 for the “frontmost” target, and 100 for all others, but there are a number of schemes used to modify these weights:

  • Prefer Mario – Make Mario’s weight 50% higher.
  • Prefer Partner – Make Mario’s partner’s weight 50% higher.
  • Prefer Front – Multiply the weights by 0.5, 0.9, 1.3… from back to front. This is used pretty frequently on enemy attacks, essentially making the front player character about twice as likely (99 : 50) to be selected.
  • Prefer Back – Multiply the weights by 0.5, 0.9, 1.3… from front to back. This is only used by Cortez’s second attack in his first form, and Blooper’s right tentacle (which has separate attacks for hitting the front and back party member!)
  • Prefer Same Alliance – Make teammates’ weights 50% higher.
  • Prefer Opposite Alliance – Make opposing actors’ weights 50% higher.
  • Prefer Less Healthy – Multiplies weights by (2.0 – target’s current fraction of Max HP).
  • Greatly Prefer Less Healthy – Multiplies weights by (1.0 – target’s current fraction of Max HP).
  • Prefer Lower HP – Multiplies weights by (1.5 – target’s current HP / 20). Effectively makes weights negative if their HP is over 30; this would cause unintended behavior if there were any such moves with random target selection used in battles with enemies that have 30+ HP, but no such battles exist in the vanilla game. This is also why Kammy Koopa prioritizes healing Bowser over herself if both are at 30+ HP, even if Bowser is at full health.
  • Prefer Higher HP – Multiplies weights by (1.0 + target’s current HP / 20).
  • Prefer in Peril – Multiplies the weights of actors in Peril by 50%. Humorously, this occasionally makes Dull Bones the preferred targets for healing items even if they’re at “full health”.
  • Choose Randomly – Picks from the final weights randomly in a weighted fashion; otherwise, chooses the target with the highest weight (preferring targets closer to the front in the case of a tie).

Enemies may rarely use other means to determine targets; e.g. Kammy explicitly chooses who to target with her magic buffs in her attack script, independently of the weighting system. In addition, enemies have specialized logic for determining when and on whom they should use their held items; that will be covered in a future post.

Counter-attack resistance

These flags determine whether the attack is immune to certain contact hazards:

  • Top-Spiky
  • Front-Spiky
  • Pre-emptive Spiky – Spikes that activate when getting near the enemy; most notably Bristles, but X-Punch and all of Cortez’s weapons except the Hook also have this property.
  • Fiery
  • Icy
  • Electric
  • Poisonous
  • Explosive – Used for unlit Bob-ombs; only checked if the move has an element that will make them explode on contact.
  • Volatile Explosive – Used for lit Bob-ombs.
  • Payback / Return Postage
  • Hold Fast – Interestingly, shares the same values as the explosion-type counter immunity for all attacks, but not necessarily Payback immunity (for instance, most shell attacks get countered by Payback, but nothing else).

Other special properties

Finally, there are a handful of flag-based parameters that don’t fall under the previous categories.

  • Badge-mutable power – Can have its damage boosted by badges.
  • Status-mutable power – Can have its damage altered by status effects (includes Merlee’s +ATK boost, for attacks that happen on Mario’s turn).
  • Chargeable – Can be boosted by / expend the Charge status.
  • Cannot miss – Ignores evasion / invisibility / accuracy (e.g. Special Moves, most buffs).
  • Diminishing returns per hit (e.g. Power Bounce, Atomic Boo breath attack)
  • Diminishing returns per target (e.g. Fire Drive, Atomic Boo surprise attack)
  • Defense-piercing
  • Can break Freeze status – A dummied-out status mechanic, where some attacks would have a chance to end Freeze early.
  • Ignores status vulnerability – Makes statuses guaranteed to hit if the target is not immune to them (e.g. cooking items that heal but inflict guaranteed negative statuses).
  • Ignites if burned – Turns attacks fire-elemental if the attacker is Burned (not used).
  • Flips shelled enemies (e.g. Jump)
  • Flips Bomb-flippable enemies (e.g. Bomb against Clefts)
  • Grounds winged enemies
  • Usable when Confused
  • Unguardable – Cannot be guarded or Superguarded.

Non-Weapon Parameters

We’ve covered basically every known parameter that can be assigned to an weapon now, but there are of a handful of notable additional flags that are only handled in the attack’s script code (most of which are set dynamically) that bear mentioning:

  • “Lethal” – Surprisingly, a flag has to be passed explicitly for a hit to be able to knock out the target at 0 HP; this is turned off for the early hits of most multi-hit attacks so the death animation isn’t interrupted by another hit. This is why some multi-hit attacks either hit or miss the entire string of attacks, or are forced to land the last hit if any prior ones connect (e.g. Hammer Bros.). Notably, some attacks never have this set, and rely on a “ghost hit” after the attack ends to kill units that reached 0 HP (e.g. Rawk Hawk’s prop drop).
  • “Action Command succeeded” – Has to be passed into the damage-dealing routine to treat an AC as successful; the AC result is fetched by a separate function call earlier in the script.
  • “Suppress status application” – Disables status ailments; used for Shade Fist with a failed action command.
  • “Allow status application” – Generally, statuses can only be applied by lethal hits; this is used on Mini-Egg to allow any of the hits to apply Tiny status.
  • “Achilles’ heel weakness” – For dealing with Iron Clefts’ unique defense type. This is only ever applied to Gulp, but is only passed in through the event script rather than being an inherent property of the weapon; in theory any attack could have that flag set.

Concluding Remarks

This should hopefully give a decent overview on all the stuff that goes into specifying how every attack in the game behaves; this only scratches the surface of the complexity of how attacks are implemented, though, as every attack has dozens of lines of script code dedicated to selecting targets, moving characters around the screen, visual effects, and so forth.

I might do a deep dive on some particular aspects of the script side of things in the future, and I definitely intend to give an overview on particular things specific to enemy AI sooner than later. In the meantime, if you’d like to get a hands-on look at all the raw weapon data in the game, as well as what various attack scripts look like as a whole, my ttyd-utils GitHub repo has tools for exporting the all the weapon structures and scripts from the game data as CSV / text files.

Tidal Wave, and Breaking the Limits of Human Perception

So, Sushie’s Tidal Wave.

SC_2021-09-12_19_36_07

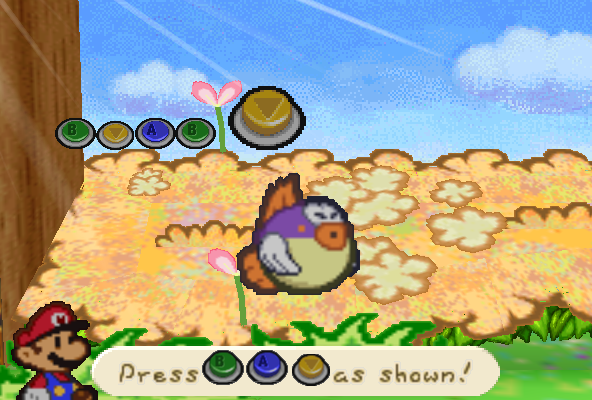
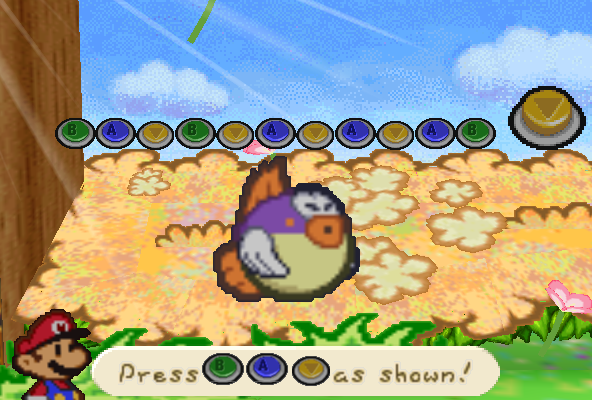
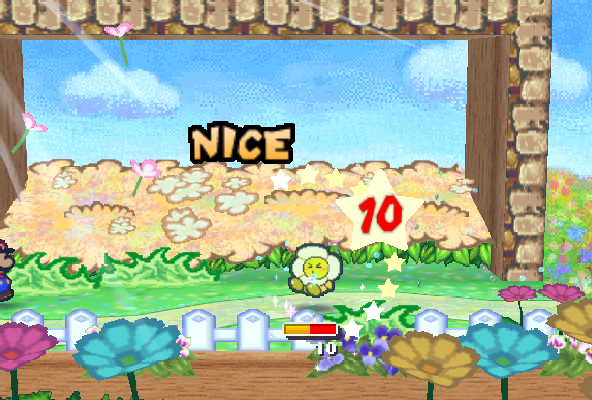
At first blush, this move may seem a pretty standard rounding-out of Sushie’s kit, being comparable in utility to Bombette’s Power/Mega Bomb, and identical to Parakarry’s Air Raid in cost and range (actually, her entire kit is basically equivalent to Parakarry’s aside from Water Block being a far more usable tool than Air Lift, but partner comparisons are a matter for another time). Its damage being dependent on correctly inputting a series of buttons isn’t too strange, either; several moves in The Thousand-Year Door have comparable Action Commands (Fiery Jinx being the closest, but also the likes of Dodgy Fog, Veil, or Showstopper).  However, although Tidal Wave does have a target level of performance required for a “successful” Action Command (six inputs nets a “Nice”), unlike its kin, it is not actually stopped at that threshold, instead allowing the player to input as many buttons correctly as they can in a fixed allotment of time.

This has interesting consequences; since the damage dealt is tied directly to the number of correct inputs, Tidal Wave has the potential to be by far the most damaging multi-target partner move (or even single-target, excluding Goombario attacking with a Charge, or a plain Multibonk on a sufficiently low-cap enemy), as well as the best bang-for-buck in terms of FP cost.

SC_2021-09-12_19_40_27 SC_2021-09-12_19_40_48

The question then arises, how tenable is getting this sort of result out of Tidal Wave, and are there any hard limits on what it can do?  To start, let’s look at how the move’s Action Command works in detail.

Tidal Wave’s Action Command – An Overview

Originally, I had planned on going off of my own and Rain‘s empirical testing for the mechanics of the move, and that would have been sufficient to get a decent understanding, but as it turns out, I was actually able to contribute a full decompilation of Tidal Wave’s Action Command update function to the papermar.io decomp project, furthering my understanding even better!  (As an aside, if you’re at all familiar with the original game and/or the C programming language, and are interested in a better future for the understanding of PM64’s code or the possibilities of modding the game, I strongly suggest joining their efforts!)  The following is a somewhat streamlined specification of how Tidal Wave’s update routine / inputs work.

At the simplest level, the attack consists of pressing the A, B, or C-Down buttons, based on a series of random button prompts that appear one at a time.  Incorrect presses will not end the attack prematurely, but will lock the player out from being able to proceed for a short while.  Each sequential pair of buttons is guaranteed to be distinct from each other; that is, the same button prompt will never appear twice back-to-back.

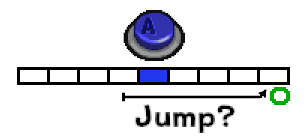
As for how the game checks for the player’s inputs, to start, the structure containing Paper Mario’s battle data holds among other things, a ring buffer that holds the last 64 frames’ worth of inputs (both newly pressed and held, but for Tidal Wave’s purposes we’re only concerned about the history of button presses).  It’s worth noting that for the purposes of this input buffer, as well as any graphical updates and a number of other processes, the NTSC versions of Paper Mario run at only ~30 frames per second, rather than the sequel’s ~60.  Most if not all Action Commands will check over the last handful of frames’ inputs at the moment an input is needed, rather than proactively tracking inputs starting at the “beginning” of an input window (several of TTYD’s work fairly similarly as well); for instance, the Jump action command checks for an A button press in the five frames before landing:

SC_2021-09-12_20_08_46


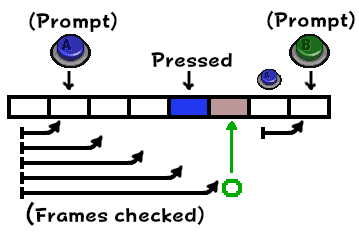
For Tidal Wave specifically, from the first frame a button prompt appears on-screen, the game checks the input history starting from the previous frame to look for a match; notably, the current frame’s input is never considered.  If you input the button successfully on a given frame, the next frame it will be accepted, and the game takes a frame afterward to play an animation of the button shrinking; on a the frame after that, the next button prompt will appear.

SC_2021-09-12_20_28_38

The extra frame of animation after a successful press has the side effect of a frame’s worth of inputs (specifically any inputs made on the frame the previous correct input was processed) being ignored completely; this doesn’t matter (yet), particularly if you’re only inputting buttons after reacting to the prompt, but is an interesting bit of trivia nonetheless.

Note that every frame, the game will continue increasing the window it looks back over until it actually detects a button press (up to a max of 15 frames).  That doesn’t matter in the case of a successful press, given inputs won’t magically be skipped on one frame only to be detected later on.  However, this increasing window does matter if you input an incorrect press; if a button press other than the prompted button (or any combination of multiple button presses) is detected within the lookback window, the game plays a buzzer sound and will not process inputs again until 10 frames later, at which point it will look over the previous 10 frames’ inputs.

SC_2021-09-12_20_41_41

In this example, the B button was pressed on frame 3 of the prompt and detected frame 4; this locked the attack from checking for inputs again until frame 14, where it looked at inputs from frames 4-13, and found that A was pressed on frame 7.  A single A press anywhere in that window would result in the same automatic success on frame 14, as would an A press anywhere in that window, followed any arbitrary combination of button presses during the rest of the window:

SC_2021-09-12_20_45_04

This buffer system can be convenient (e.g., for allowing a corrected input slightly before the lockout period actually ends), but consecutive mistakes can be costly!  If an incorrect button is pressed first in the 10-frame lockout window, then on the frame it ends, another 10-frame lockout will start immediately, and the first button pressed in those ten frames or afterward will be processed when it ends.  Notably, if the player were to buffer two or more button presses during a lockout window, only the first one will ever be considered.  For instance, if the player were to press B on frame 3 (resulting in a lockout starting frame 4), then realized their mistake and fat-fingered B, then A on frame 9 and 10, respectively, the B press on 9 would start another lockout window on frame 14, and the A press would be lost, meaning the player would have to press A again sometime on frame 14 or afterward (which would be detected on frame 24 at the earliest) to continue to the next prompt.

This basically covers everything about the move technically aside from its duration; the attack lasts for a total of 98 inputtable frames (including the look-back frame before the first button appears), or just under 3.3 seconds.  In theory, with tool-assisted frame-by-frame advancement to press a button on the first frame its prompt appears on-screen, the minimum time between presses is a mere 3 frames (one for the input to be processed, one for the animation of the button shrinking, and one for the next prompt to appear).  With added rewind / savestates to gain foreknowledge of what button would come next, this could be cut to 2 frames per button, since you wouldn’t have to wait for it to visually appear.  In either case, this would theoretically allow for dozens of presses; however, things aren’t that rosy in actuality.

If playing on console (and some emulated versions of the game), pressing 14 correct buttons causes the game to crash.  I don’t know the exact reason why this occurs, but I know that the Action Command data structure has space for 15 HUD element identifiers, the first of which Tidal Wave reserves for some specific use, and the rest of which are allotted one per button, so my guess is there’s some sort of buffer overrun happening when a fifteenth button icon is attempted to be spawned.  Funnily enough, the devs did foresee this potentially being an issue, and put a check in the code to stop the attack early when processing the 15th button; unfortunately, that check only gets reached after the fifteenth button icon would have already spawned, at which point it’s too late to fix the issue:

SC_2021-09-12_21_12_01

So sadly, the dreams of Sushie dealing nearly enough damage to one-shot the Anti Guys Unit at full health are crushed, but given the game was originally meant to be played by humans, who don’t generally perceive the game frame-by-frame (much less a frame in advance), how many buttons should one reasonably expect to be able to press in the first place?

The Limitations of Human Reaction

From what’s been discussed before, if going only by what’s already visible on screen, in addition to the 2 unavoidable frames between each button prompt, a human player is going to necessarily waste at bare minimum one frame per button prompt, as they wouldn’t know what to press before the button displayed on screen, and it takes an extra frame before the previous input can be read.  But that’s assuming instantaneous reaction time, which even in the best of setups is unreasonable.  From what I’ve heard from a variety of sources, an average human reaction time to any visual stimulus is somewhere in the ballpark of 200 to 250 milliseconds at best, which would add an additional 6-8 frames on top of that (using a low-latency 144Hz monitor with this test, I can personally pretty consistently hit the lower end of that range).  This is before compensating for additional factors like latency in one’s monitor or emulation setup, which could easily add another ~100ms (3 frames) or more on top.

All of this is also only considering reaction time to a single given stimulus, whereas Tidal Wave always has at least 2 possible choices for each button prompt.  A cursory search didn’t turn up any good sources or tools for determining how much added mental load comes from distinguishing multiple possible stimuli (and since the button choices are random, prediction will get you at best a 50% success rate per button), so I went ahead and tested how well I could perform the actual move.

Experiment 1: Pure Reaction

For this and future experiments, I did my tests on elDexter’s Black Pit mod (since I had it handy at the time, and it also includes a fix Rain and I came up with that ends the move after 13 successful inputs to avoid crashing) using an actual N64 and Everdrive on a CRT, which should have pretty much the minimum possible latency while maintaining accurate performance (i.e. no slowdown).  I also gave myself two warmup runs of the move before doing ten actual trials (this will be the case for future experiments as well).

Using pure reaction and no early guess inputs, my results were fairly consistent:

6, 6, 6, 6, 6, 6, 7, 5, 6, 6

The one run where I got only 5 had multiple input errors, and the one run I got a 7 had no premature presses but I suspect had lucky priming (i.e., I “expected” the button that actually appeared more often than not).  A couple other attempts were likely a few frames off of 7 inputs, but not quite there.  Given the attack lasts 98 inputtable frames and disregarding the 19 frames wasted due to the time between / before prompts, my reaction time must have averaged between 79 / 7 and 79 / 6 frames per button (about 11.3 ~ 13.1 frames, or 380 ~ 440 milliseconds).

So humans are disappointingly slow at this sort of thing, then, and it seems like even the thought of double-digit damage is well out of the question for guess-less reaction.  But intriguingly, my average reaction time is actually longer than the lockout period the player is punished with after an incorrect press (10 frames, or ~334 milliseconds).  This, plus the fact that all button prompts after the first one have only two possibilities, leads to a wealth of possible exploits!

Removing Reaction from the Equation – The Genesis of “Cycle-Mashing”

Assume that the player has just correctly input the C-down button for the first button in the attack.  There are then only two possible prompts that could come up next; A or B.  If a player reacted with comparable reaction time to me, their input for the second button would occur about 14-16 frames after the previous one.  But suppose instead they chose not to react, but to execute a predetermined response instead, pressing A 2 frames after the C-down input and B another 2 frames after that.  If the next button was A, it would be immediately received correctly, saving a whopping 12 to 14 frames over reacting normally; but as it turns out, even if the button was B, after the 10-frame lockout period ended from the A press, the B would be taken immediately, still coming out 2 to 4 frames earlier than a reaction!

Furthermore, this sort of approach can be chained!  Here’s the basic idea of the simplest setup that accomplishes this:

SC_2021-09-12_22_00_33

  • The player reacts to the first button normally (A, in this case).
  • Since the game doesn’t consider inputs made on the frame the correct input is processed, the player waits at least 2 frames (0.067 seconds) to input anything else, then presses one of the other two buttons.
  • After that, the player cycles through the three inputs in a consistent order, starting with the button not yet pressed, timing it so that every button is pressed 12 or more frames after the one two presses before it (guaranteeing that the first of the two possible buttons after a “wrong guess” lockout scenario doesn’t get eaten by the frame where input is ignored).

Experiment 2: “Slow” (4~5Hz) Cycle Mashing

The simplest possible variant of this line of approach is to react to the first button press, then cycle through the buttons in order (either B, A, C-down or B, C-down, A starting from whatever the first button is) at a rate of 6 frames per press or slower (5 Hz / button presses per second).  I’ve taken to calling this sort of approach to Tidal Wave using “Snow-Whirled strats”, after the Mario Party 6 minigame that requires a similar sort of input, but “cycle-mashing” is probably a more descriptive term.

If performed accurately at exactly 5 inputs per second, this guarantees that every prompt is successfully hit within one or two attempts, and allows the time between inputs to get as low as 12 frames in the worse case (2-4 frames faster than my average reaction time), and a mere 6 frames (saving 8-10 frames over reaction) in the better case!  Even if performed a fair bit slower (7.5 frames per press / 4 Hz) to reduce the risk of slight variance in speed causing a button press after a lockout to get ignored, the worst possible case is still comparable to human reaction, with a time save of 7.5 frames per better-case prompt.

To practice mashing between 4 or 5 buttons a second, one could imagine keeping time in eighth notes to a tune between 120 and 150 BPM.  Conveniently the standard PM64 battle theme falls snugly in that range (at right around 140 BPM!), but one could feel free to experiment around and see what works.   How did this fare in practice, then?

7, 9, 7, 8, 3, 6, 8, 10, 6, 9

A definite improvement on average!  Of note, the first “6” was actually the worst possible string of prompts I could have gotten given the direction I was mashing in; I cycled through C-down, B, A in that order, and the seven buttons I got were C-down, A, B, C-down, A, B, C-down.  So good to know that this holds up against reaction even in the true worst-case!

The one outlier “3” there was one where I totally failed to input a button or two, trapping me in a cycle of lockouts for most of the attack.  Therein lies the problem with any cycle-mashing exploit, actually; going off-script has pretty variable results depending on exactly what kind of luck you get afterward.  But if you can manage a steady 4-to-5 Hz cycle with no dropped inputs, these results prove you can definitely get Tidal Wave to at least equal Power Bomb / Mega Bomb in damage, and it certainly outstrips Air Raid’s utility.  But there are still more possibilities we can consider…

Experiment 3: “Lopsided” Cycle-Mashing

As a slight variant of the 4-5Hz mash, consider that the main stipulation to avoid eaten inputs is that every other press must be separated by 12 frames or more.  The natural way to accomplish that would be to press each individual button 6 frames apart, but strictly speaking there’s no functional difference in the worst-case between doing that, and alternating windows of 2, 10, 2, 10, … frames (1+11 wouldn’t work, as a “good” scenario would result in the second input in a short pair getting ignored):

SC_2021-09-12_22_00_33

SC_2021-09-12_22_37_21

Having to mash pairs of inputs — BA, CB, AC … — close together, rather than a consistent cycle, does add complexity, but could save the player up to 4 frames (or more, with a slower mashing speed) at the end of the attack if they happen to end the attack in the that particular part of the cycle.  In practice, here’s what I got for my results (mashing with close pairs at around 135bpm, or 2.25 per second):

9, 9, 8, 6, 9, 8, 8, 9, 8, 9

I happened to be surprisingly consistent during this test; I don’t know how much of that came down to the potential extra few frames, and how much came down to more average luck (or potentially added resilience to mis-inputs, as I know I definitely made more input errors this time).  Overall not too big an average difference, though; especially given this is also probably harder to input on a controller that doesn’t have C-down mapped to a dedicated button, I wouldn’t recommend this over the previous approach, but I thought I’d mention it here for reference.

Neither of these were actually my initial approach to breaking this move, though…

Experiment 4: “Fast” (10.7~12.5Hz) Cycle Mashing

This is closer to my original concept for a mashing strategy to beat reacting to the move on average.  Honestly, I didn’t really come up with the slower variants listed above until I started researching for this article; really, it just goes to show how much I underestimated just how slow reaction time is!  At any rate, the gist of the strategy is the same; react to the first button, then cycle, but rather than abusing the lockout window by pressing 2 buttons every 12+ frames, one can abuse the fact that the lockout window only buffers the first input pressed within it to fit in an extra cycle’s worth of buttons, pressing 5 buttons every 12+ frames, and cutting down the wasted time if you get a “good” button prompt!

SC_2021-09-12_22_54_06

This higher-speed approach is not without its downsides; in this case, rather than 10.7 Hz (~14 frames per 5 presses) being a practical target before the worst-case approaches what would already be possible with reaction (though that is still a consideration), it’s actually absolutely vital to mash at a sufficient rate to guarantee (or at least make it very likely) that exactly four buttons land in the lockout window in the case of a “bad” prompt.  Otherwise, you run the risk of starting the next prompt with two wrong buttons in a row, causing a double-lockout at best and ruining the rest of the attack at worst:

SC_2021-09-12_23_05_01

This is easier to avoid the closer to the 12.5 Hz speed you can reach, but mashing at a high speed also runs the risk occasionally of landing two presses less than 2 frames apart if your rate is too inconsistent, meaning a correct button could be followed up by another one on the next frame, getting ignored.  In practice, I think this sort of mistake happens a bit less often than errors related to going too slow when practiced up, but it’s kind of hard to tell.  Obviously, straight-up missing inputs can easily throw everything a bit out of whack as well, but how much it affects results depends on when exactly it happens (e.g. if it happens during the latter part of a lockout period, it might not make any difference at all!)

Despite all the shortcomings, this strategy has the potential to be explosive if you get even moderately lucky; whereas “worse-case” prompts will still take 12-14 frames between inputs, “better-case” ones will take less than 3 frames on average, saving huge amounts of time throughout the span of the attack in all but the worst cases!

Here’re the results I got on a set of ten trials:

9, 9, 10, 8, 7, 5, 5, 12, 8, 9

As the 5’s (which were definitely caused by at least one failed input) suggest, this is definitely a riskier strategy than the earlier ones, but is the first one with a fair chance of landing a sweet double-digit damage number across the field!  (Although with that chance comes the risk of a crash after 13 presses if you’re not careful; oh well…)

If this hasn’t scared you away yet, you could finally try:

Experiment 5: “Reactionless” Fast Cycle-Mashing

Same idea as before, but now you don’t even wait for the first button to react, instead starting a cycle-mash as soon as (or even before) the attack starts.  This was actually the first mashing method I ever came up with (and I recorded a sample of myself executing it on console, with video proof of ability to hit 13s and crashes here).  On average, it slightly outperforms the previous method when simulated with perfect inputs, especially towards the faster end of the mashing speed range.

The killer in practice, though, is that in addition to all the previous drawbacks, there’s the possibility that the first button is neither of the first two buttons pressed, incurring at bare minimum a two-lockout (20 frame) penalty over the best-case 2-4 frame “instant” first successful press, if not more depending on your exact speed and consistency.  If you’re lucky, though, a successful first press will save a solid 10+ frames over reacting, massively increasing the likelihood of a 10+ damage attack.

My results for this were disappointingly tame (though surprisingly more consistent) compared to some previous recordings and off-stream play sessions, alas:

7, 7, 9, 9, 7, 10, 8, 6, 6, 7

Likely, this is both due to unluckiness with the relative inconsistency of the start of the attack, and due to the fact that it’s kind of hard to pinpoint exactly how fast 10.7-12.5 Hz is while keeping an even tempo.

Conclusions / Parting Words

All in all, Tidal Wave is a really unique move and fun to mess around with for a variety of reasons.  If there’s any takeaway from this article it’s that I strongly suggest you try out at least the slow cycle-mash; it should be pretty doable on any controller (provided you don’t have a C-stick that likes to input left and right randomly when pressing down, as those do count as “wrong” inputs!) and isn’t likely to perform any worse than performing the move normally, especially if you have a higher-latency setup than mine.  I feel the mechanics of the input buffer still leave some untapped potential for even more better-than-reaction strategies, as well.  I didn’t even really try out stuff like purely random mashing (mostly due to it not benefiting from my cycle-mashing strats’ abuse of the fact that most prompts only have two possibilities), or any strategies involving both predetermined input sequences and further reactions.

Let me know if any of these strategies give you markedly better results on Tidal Wave than before, or if you’ve found any other strategies that get consistent results (preferably with videos and/or theorycraft explanations, in which case I might make addendums to this post in the future!)

Sorry that I’ve been a while in getting to the next big TTYD post, but Tidal Wave’s been in the back of my mind as a topic for years now, and I’ve been distracted by both getting a major v2 update out to my TTYD Infinite Pit mod, as well as playing through elDexter’s previously mentioned (and excellent) Black Pit mod, contributing to the PM64 decompilation, and other such things.  I imagine I’ll get back to it some time this year, but I can’t predict my interest levels in my side projects, so you’ll have to bear with me in the meantime!